ref from http://blog.sina.com.tw/jiing/article.php?pbgid=872&entryid=583193
Vim tips: Using viewports
Vim 訣竅:使用view ports
By Joe 'Zonker' Brockmeier on May 10, 2006 (8:00:00 AM)
試譯者:jiing
A lot of folks use Vim, but many exploit only a small percentage of the editor's features. Sure, you might know how to do the basics in Vim, but what about using more advanced features such as folding, split windows, and marks? With a little practice, you can really boost your productivity with Vim.
In this and future articles, I'm going to cover Vim features that you may not be familiar with if you're a casual Vim user. If you're confident using Vim to edit configuration files or make short edits in text files, but maybe not too comfortable with undertaking major writing or coding in Vim, then these articles should be for you.
有許多人使用vim,不過許多人只探索了編輯器特性的一丁點。當然了,你可能知道Vim的基本用法,不過關於更進階的特性,例如摺疊(folding)、分割(split)視窗和標示(marks)呢?用一個小小的練習,你可以用Vim真正地提升你的生產力。
在本篇和未來的文章中,我將涵括Vim中你可能不熟悉的特性(如果你是個隨性的Vim使用者)。如果你有信心用Vim來編輯組態設定檔或是使用小小的文字編輯,但可能用Vim來寫程式碼或是進行大量的書寫時不是太舒服的話,那麼這些文章應該是為你而寫的。
Splitting Vim's viewport
分割Vim的視埠(viewport)
A really useful feature in Vim is the ability to split the viewable area between one or more files, or just to split the window to view two bits of the same file more easily. The Vim documentation refers to this as a viewport or window, interchangeably.
在Vim中一個真的很有用的特性是去將一或多個檔案分割成數個可視的區域的能力,或只是分割視窗更容易地看同個檔案中的二個位元(2 bits)。Vim文件中將這個稱作viewport或window,二個詞是可被交換使用的。
You may already be familiar with this feature if you've ever used Vim's help feature by using :help topic or pressing the F1 key. When you enter help, Vim splits the viewport and opens the help documentation in the top viewport, leaving your document open in the bottom viewport.
如果你曾經使用Vim的輔助特性(藉由:help topic 或是按下 F1 鍵),你可能已經熟悉這項特性。當你進入輔助說明(help)時,Vim分割viewport,並且開啟輔助說明文件在上面的viewport,而讓你的文字開啟在底下的viewport。
Vim viewport keybinding quick reference
Vim viewport的鍵盤對應的快速參考
:sp will split the Vim window horizontally. Can be written out entirely as :split .
:sp 將View視窗水平分割。可以完整寫出成:split
:vsp will split the Vim window vertically. Can be written out as :vsplit .
:vsp 會將視窗垂直分割。能被寫成 :vsplit
Ctrl-w Ctrl-w moves between Vim viewports.
Ctrl-w Ctrl-w 會在View的viewports間移動
Ctrl-w j moves one viewport down.
Ctrl-w j 會把一個viewport 往下移
Ctrl-w k moves one viewport up.
Ctrl-w k 會把一個viewport 往上移
Ctrl-w h moves one viewport to the left.
Ctrl-w h 將一個viewport往左移
Ctrl-w l moves one viewport to the right.
Ctrl-w l 將一個viewport往右移
Ctrl-w = tells Vim to resize viewports to be of equal size.
Ctrl-w = 告訴Vim 去將viewports的尺寸變成相同的大小
Ctrl-w - reduce active viewport by one line.
Ctrl-w - 將作用中的viewport 減少一行
Ctrl-w + increase active viewport by one line.
Ctrl-w + 將作用中的viewport 增加一行
Ctrl-w q will close the active window.
Ctrl-w q 會關閉作用中的視窗
Ctrl-w r will rotate windows to the right.
Ctrl-w r 會將視窗轉到右方
Ctrl-w R will rotate windows to the left.
Ctrl-w R 會將視窗轉到左方
If you want to use this feature for something other than viewing Vim's help files, you can split the viewport by using :sp, :split, or Ctrl-w n -- they do the same thing, but just typing :sp will save you a few characters, and it's easier to use with arguments, such as filenames. Rememberthe Ctrl-w part, though, because it will come in handy for most operations with windows.
如果你想要用這個特性來做些除了觀看Vim的輔助檔以外的事,你可以用:sp來分割視埠,:split,或是Ctrl-w n --他們會做同一件事,不過只打:sp會省下幾個打字的功夫,且它也較容易與引數一起使用,例如檔名。雖然只記得Ctrl-w的部份,因為它對於大部份視 窗的操作會。??
The :sp command will divvy up the viewport into two equal viewports for the file that you have open. If you'd like to work on two files simultaneously, no problem -- just follow the command with the filename you'd like to use, like this:
:sp 命令會對於你所開啟的檔案將視埠分割成二個相等大小的視埠。如果你想要同時在二個檔案上工作,沒問題--只要在你要的命令後加上你要用的檔名,像這樣:
:sp filename
That will open filename in the new viewport. You can even add a search string to that to move directly to the first instance of a keyword, like so:
那會在新的視埠開啟檔案。你甚至可以新增一個搜尋字串到命令中,以直接到第一個你搜尋的關鍵字(keyword)處,像這樣:
:sp +/searchstring filename
Easy as falling off a log. What if you don't want to have equal viewports? For example, let's say you want to open a reference file in the top viewport, but want the majority of the viewport available for the file you're actually editing. No problem. Just prepend a number to the sp command, and the new viewport will fill that number of lines:
就像作個紀錄般容易。如果你不想要有同樣大小的視埠呢?例如,讓我們假設你想要開啟一個參考檔案在頂端的視埠,不過想要大部份的視埠用於你真正在編輯的檔案。沒問題!只要在sp命令前加上個數字,新的視埠就會以那個數字的行數來填滿:
:10 sp filename
Now you have a viewport with 10 lines, but what if you've decided that you'd like to give both viewports equal real estate? That's easy enough too. Instead of going into command mode, you can use a normal keybinding to accomplish this. Ctrl-w = tells Vim to assign an equal number of lines to each viewport.
現在你有一個10行的視埠,不過如果你已經決定你想要讓二個視埠有著相同的大小?那也有夠容易的。不用進去命令模式,你可以用一個常用的按鍵對應(keybinding)來做這件事。Ctrl+w = 告訴Vim指派相等行數給每一個視埠。
To move between the viewports while working, use Ctrl-w j to move down, and Ctrl-w k to move up. This should prove easy to remember -- Ctrl-w for "window" commands, and the normal vi movement commands j for down and k for up. You can also cycle between viewports by using Ctrl-w Ctrl-w.
當工作時,要在視埠間移動,用Ctrl-w j來向下移,Ctrl-w k來向上移。這應該證明了它很容易記 -- Ctrl-w 是對於「視窗(window)命令」,而一般的vi移動命令j來向下移動,k來向上移動。你也可以用Ctrl-w Ctrl-w來在視埠間循環地移動。
You can increase or decrease a viewport's size after it's been created. Use Ctrl-w + to increase the active viewport, and Ctrl-w - to decrease its size by one line. If one line at a time isn't sufficient, add a modifier before the + or -. For instance, to add 13 lines, use Ctrl-w 13+.
你可以在視埠被建立後,增加或減少一個視埠的尺寸。使用Ctrl-w + 來增加作用中視埠的尺寸,Ctrl-w -來減少它的尺寸一列。如果一次一列不夠,那麼加一個修飾元(modifier)在+號或-號的前面。例如,要增加13行,使用Ctrl-w 13+。
If horizontal viewports just don't do it for you, Vim also supports splitting viewports vertically. To do this, just use :vsp, or :vsplit if you prefer to spell it out. Movement between vertical viewports is similar to moving between horizontal viewports. Ctrl-w Ctrl-w works, and instead of using the j and k movement keys, use the h and l movement keys to move back and forth between viewports. To move to the viewport to the right, for example, you'd use Ctrl-w l.
如果水平的視埠沒有為你做這件事, Vim也支援垂直地分割視埠。要做這件事,只要用:vsp或如果你偏好將它拚出來,可以用:vsplit。在垂直視埠間移動很像在水平視埠間移動。也可以 用Ctrl-w Ctrl-w,而不是用j或k的移動鍵,用h和l的移動鍵來向後一個和向前一個視埠移動。例如,要將視埠移動到右方,你可以用Ctrl-w l。
It's also worth mentioning that you can open a file in a viewport just to view the file, without opening it to edit. To do this, use the :sview filename command. To do it vertically, use :vert sview filename .
也值得一提的是你可以在一個視埠中開啟一個檔案,只是去觀看檔案,而不用開啟它來編輯。要這麼做,用 :sview filename命令。要以垂直地方式來做,那麼用:vert sview filename。
You can close a window in one of several ways. The easiest is to just use the quit command, :q, or you can use Ctrl-w q. Note that if it's the only window open with a file, Vim will prompt you to save the file if it isn't saved already.
你也可以用數種方法中的一種來關閉視埠。最簡單的方法就是使用quit命令,:q,或者你可以用Ctrl-w q。注意,如果這是唯一開啟檔案的視窗,如果檔案尚未儲存,Vim 會提示你要儲存檔案。
Also, it's possible to rotate the windows, if you decide you'd prefer to have the top window on the bottom or vice versa. To do this, use Ctrl-w r to move windows to the right or down. When you do this, for example, in a Vim session with three horizontal viewports open, the top viewport would go to the middle position, the middle viewport would take the bottom position, and the bottom viewport would rotate to the top. To go in the opposite direction, use Ctrl-w R instead.
同樣地,也可以去旋轉視窗,如果你決定你偏好讓頂端的視窗在底端,反之亦然。要這樣做,用Ctrl-w r來移動視窗到右方或是下方。舉例來說,當你在一個有三個水平視埠開啟的Vim session中這麼做,頂端的視埠會到中央,中央視埠會到底端,而底端的視埠會轉移到頂端。要以向反的方向移動,改用Ctrl-w R。
Vim often offers several different ways to achieve the same things. For instance, as I pointed out, :sp, :split, and Ctrl-w n all create a new viewport. I haven't listed all of the possible commands or keybindings to accomplish all of the tasks here.
Vim 通常提供數種不同的方法來儲存相同的東西。例如,如我指出的,:sp, :split和Ctrl-w n都會建立一個新的視埠。我還沒有列出所有可能的命令或是對應鍵(keybindings)來完成所有在此的工作。
Over the years, I've found Vim's split windows features to be very useful. I often use it to edit a column or article in one viewport, and to read and copy from notes in another viewport.
過了數年之後,我已經發現Vim的split視窗特性是非常有用處的。我通常用它來編輯一行或是在一個視埠中的文章,然後從另一個視埠讀取並複製筆記。
2009年2月26日 星期四
Vim 訣竅:使用view ports
2009年2月11日 星期三
SmartMovie 簡單介紹、影片壓縮、字幕製作
SmartMovie 簡單介紹、影片壓縮、字幕製作
軟體名稱︰SmartMovie
軟體介面︰英文 ( 有中文化 )
軟體官方︰Lonely Cat Games
軟體簡介︰ S60 平台上知名的 AVI 播放器。
優點︰ 支援外掛字幕。(只支援 Sub 格式字幕。) 檔案小不佔用資源
缺點︰ 檔案清單中的中文會變以「?」顯示,建議使用英文檔名。
快速鍵 (播放中)︰ 方向鍵上/下 (以播放方向為準):調節音量
方向鍵左/右 (以播放方向為準):快進快退
OK鍵: 暫停/播放
1鍵:亮度調節(暗)
3鍵:亮度調節(亮)
2鍵:顯示/隱藏搜尋列
4鍵:跳轉到指定時間
5鍵:切換播放方向
6鍵:切換顯示模式 (原始大小/符合畫面)
7鍵:顯示/隱藏字幕
8鍵:顯示/隱藏時間列
9鍵:逐影格播放
0鍵:切換時間列顯示方式 (已播放時間/剩餘播放時間)
左鍵︰回功能表
右鍵︰退出
壓縮 SmartMovie 影片︰
AVI 轉檔時不大建議使用 SmartMovie 官方的轉檔軟體,因為不管用什麼 Code 編碼都會有平滑過頭的現像,如果轉檔影片有內崁字幕時壓縮後字幕會很糢糊。
建議使用︰
WinMEnc( 免費、免安裝、幾乎支援讀取所有影片格式,可輸出為 AVI、MP4 一般移動裝置常用到的格式)
壓縮格式︰
視頻︰DivX_512 K_320X240
為什麼建議使用 DivX Code 呢?
之前曾以 XviD 壓縮一部 600 MB 影片,使用 SmartMovie 播放時影片畫面會破碎。之後又用 DivX 壓縮了一次,結果竟然能正常播放了。
不過話說回來以前我所有影片幾乎都是用 XviD 作壓縮倒也沒遇過類似問題,反正為了不浪費時間壓縮還是建議使用 DivX。
在 Nokia N73 手機上作過多次測試 512K 算是最穩定的輸出值 (以動作片而言),如果壓縮比較靜態的影片想增加畫面品質其實可以再作再高品質設定。
解析度可依照裝置解析度設定,並使用「配合寬度」或「配合高度」來讓影片保持比例,否則畫面將會拉伸展至所選擇的解析度而失去原有比例。
視頻︰MP3_96Kb_22050Hz
移動裝置的擴音器基本上太高品質設定除了增加檔案壓縮後大小,並不會讓你有明顯的高品質聽覺感受,所以上述設定值已經很夠用了 (Nokia N95 內建的高品質錄製,音訊品都沒那麼高了。)。另外 SmartMovie 只支援 MP3 音訊解碼,這裡只能用 MP3 作音訊編碼 。
(如果你要壓縮 MP4 時則必需選擇 AAC,Nokia 內建的 RealPlayer 並不支援 MP3 編碼音訊…離題了)
字幕︰
雖然 SmartMovie 支援外掛字幕,不過轉換即麻煩品質又差強人意,所以不如在轉檔時直接將字幕內崁效果還好一些。要崁入字幕其實只要將字幕跟要轉檔的影片在放在同一資料夾下並以相同檔名命名,
例如︰
E:\Video\Final Fantasy VII AC.aviE:\Video\Final Fantasy VII AC.srt
接著在字幕選項中選擇所載入字幕格式,在壓縮過程中 WinMEnc 便會將字幕崁入。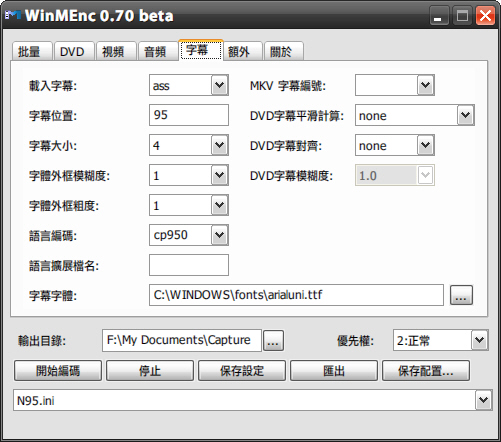
額外︰
說真的這頁面中老是出現一些參數指令,我自己也搞不懂。不過這頁面卻有一個滿好用的功能,就能可以剪裁影片。
只要在「開始時間」和「結束時間」填入時間即可以進行影片剪裁。
開始時間︰00:01:00
在填入的時間之前片段將被剪掉。(範例︰剪掉1分鐘以前片段。)
結束時間︰00:10:00
在填入的時間之後片段將被剪掉。(範例︰剪掉10分鐘以後片段。)
(特別注意的是如果同時在「開始時間」和「結束時間」填入時間,那麼「結束時間」的時間算法是以「開始時間」剪裁後開始算起,而不是以未剪裁前算起。)
建立 SmartMovie 字幕︰
安裝 VobSub2.23,安裝完後後開啟「開始功能 表\VobSub\SubResync」。
SubResync 基本上來是來重新同步字幕的程式,但我們也可以用它來轉換字幕格式。
SubResync 支援的字幕格式相當多,不過為了操作方便建議使用 Srt 格式字幕來進行轉換。
開啟 SubResync 後使用「開啟」鈕來選擇你要轉換的字幕,選定字幕後別一下子開啟,下方選項中還有需作設定的選項,
字元集 ︰ChineseBig5幀/秒︰XX ( 這裡要選擇配合此字幕的影片影格率,未轉檔前影片 )
選擇完成後按下「開啟」鈕,這時會回到 SubResync 不需要作任何設定直接再按下「另存為…」按鈕,
存檔類型選擇為︰Microdvd (*.sub)
接下來可以將影片和字幕移至手機,影片和字幕必需在同一資料夾檔名必需相同。
例如︰
E:\Video\Final Fantasy VII AC.avi
E:\Video\Final Fantasy VII AC.sub
效果預覽︰
外掛字幕︰
內崁字幕︰